在2D游戏中实现水效果的着色器
上一个知识点介绍的玻璃着色器它的效果是静态的;它的扭曲效果永远都不会改变。只要对着色器稍加修改,就可以将它转换成一个有动画的材质,它非常的适合2D游戏中的水体特效。在这个知识点将会使用 第五章,对表面着色器中的顶点使用动画 中类似的技术: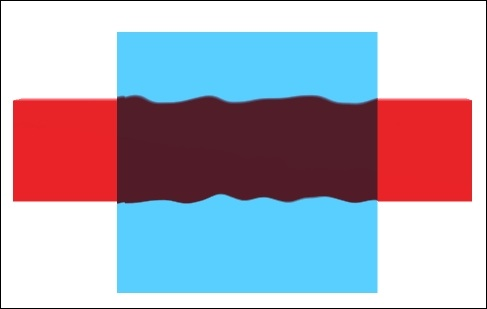
- 始前准备
这个知识点基于 使用抓取通道 知识点中描述的顶点和片元着色器,因为它很依赖抓取通道。- 1.创建一个新的抓取通道着色器;你可以自己写一个新的着色器或者使用 使用抓取通道 这个知识点中用到的着色器作为开始。
- 2.为你的着色器创建一个对应的材质球。
- 3.将材质球应用到一个平面几何图形中,它将用来表示2D中的水。为了让这个效果起作用,您应该在其后渲染一些东西,以便可以看到类似水的扰动效果。
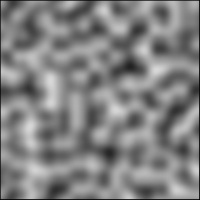
- 4.这个知识点需要一张噪音纹理,用来获得伪随机的值。选择一个无缝的噪音纹理很重要,比如由可以铺砌的2D的 Perlin 噪音生成的噪音纹理,如下图所示的那样。这是为了确保材质应用到一个很大的游戏对象中时,不会看到有任何不连续的割裂感。为了让效果起作用,纹理需要以 Repeat 模式导入。如果你想要让你的水体效果看起来平滑和连续,那么在 导入器(Inspector) 那里要设置成 Bilinear 。这样设置能确保纹理能从着色器中正确的被采样:
- 操作步骤
你可以修改着色器中的代码来创建动画效果。请跟着下面的步骤走:- 1.将下面的代码添加到着色器的属性块中:
_NoiseTex("Noise text", 2D) = "white" {} _Colour ("Colour", Color) = (1,1,1,1) _Period ("Period", Range(0,50)) = 1 _Magnitude ("Magnitude", Range(0,0.5)) = 0.05 _Scale ("Scale", Range(0,10)) = 1- 2.并且在次通道中添加与属性对应的变量
sampler2D _NoiseTex; fixed4 _Colour; float _Period; float _Magnitude; float _Scale;- 3.为顶点函数定义下面 输出结构体(output structure) :
struct vertOutput { float4 vertex : POSITION; fixed4 color : COLOR; float2 texcoord : TEXCOORD0; float4 worldPos : TEXCOORD1; float4 uvgrab : TEXCOORD2; };- 4.这个着色器需要知道每个片元在空间上的精确位置。为了实现这一过程,将代码
o.worldPos = mul(unity_ObjectToWorld, i.vertex);添加到顶点函数中去:
vertOutput vert(vertInput i) { vertOutput o; o.vertex = UnityObjectToClipPos(i.vertex); o.color = i.color; o.texcoord = i.texcoord; o.worldPos = mul(unity_ObjectToWorld, i.vertex); o.uvgrab = ComputeGrabScreenPos(o.vertex); return o; }- 5.使用下面的片元函数:
fixed4 frag(vertOutput o): COLOR { float sinT = sin(_Time.w / _Period); float2 distortion = float2( tex2D(_NoiseTex, o.worldPos.xy / _Scale + float2(sinT, 0) ).r - 0.5,tex2D(_NoiseTex, o.worldPos.xy / _Scale + float2(0, sinT) ).r - 0.5); o.uvgrab.xy += distortion * _Magnitude; fixed4 col = tex2Dproj( _GrabTexture, UNITY_PROJ_COORD(o.uvgrab)); return col * _Colour; }- 6.完整代码:
Shader "Custom/IWS"
{
  Properties
  {
      _NoiseTex("Noise text", 2D) = "white" {}
      _Colour ("Colour", Color) = (1,1,1,1)
      _Period ("Period", Range(0,50)) = 1
      _Magnitude ("Magnitude", Range(0,0.5)) = 0.05
      _Scale ("Scale", Range(0,10)) = 1
  }
  SubShader
  {
      Tags
      {
          "Queue" = "Transparent" "IgnoreProjector" = "True" "RenderType" = "Opaque"
      }
      GrabPass
      {
          "_GrabTexture"
      }
      Pass
      {
          CGPROGRAM
          #pragma vertex vert
          #pragma fragment frag
          #include "UnityCG.cginc"
          sampler2D _GrabTexture;
          sampler2D _NoiseTex;
          fixed4 _Colour;
          float _Period;
          float _Magnitude;
          float _Scale;

          struct vertOutput
          {
              float4 vertex : POSITION;
              fixed4 color : COLOR;
              float2 texcoord : TEXCOORD0;
              float4 worldPos : TEXCOORD1;
              float4 uvgrab : TEXCOORD2;
          };
          struct vertInput
          {
              float4 vertex : POSITION;
              float4 color : COLOR;
              float2 texcoord : TEXCOORD0;
          };

          vertOutput vert(vertInput i)
          {
              vertOutput o;
              o.vertex = UnityObjectToClipPos(i.vertex);
              o.color = i.color;
              o.texcoord = i.texcoord;
              o.worldPos = mul(unity_ObjectToWorld, i.vertex);
              o.uvgrab = ComputeGrabScreenPos(o.vertex);
              return o;
          }

          fixed4 frag(vertOutput o): COLOR
          {
              float sinT = sin(_Time.w / _Period);
  			float2 distortion = float2
  			(	tex2D(_NoiseTex, o.worldPos.xy / _Scale + float2(sinT, 0) ).r - 0.5,
  				tex2D(_NoiseTex, o.worldPos.xy / _Scale + float2(0, sinT) ).r - 0.5
  				);
  			o.uvgrab.xy += distortion * _Magnitude;
  			fixed4 col = tex2Dproj( _GrabTexture, UNITY_PROJ_COORD(o.uvgrab));
  			return col * _Colour;
          }
  		ENDCG
      }
  }
}
- 原理介绍
这个着色器跟 实现一个玻璃效果的着色器 知识点中介绍的着色器很像。主要的区别就是这个着色器它时一个有动画的材质;它的扰动效果不是从法线贴图中生成的,而是通过当前的时间来计算出的一个持续的动画。用来扰动抓取纹理的UV数据的代码似乎有点复杂;让我们来理解它的效果时如何生成的。思路是用一个正弦函数来让水晃动。这个效果需要随着时间变化。为了获得这个效果,着色器产生的扭曲效果依赖于当前的时间,而这个时间可以通过内建的 _Time 变量获得。变量 _Period 决定了正弦函数的周期,意味着水波出现的有多快:float2 distortion = float2(tex2D(_NoiseTex, o.worldPos.xy / _Scale + float2(sinT, 0) ).r - 0.5,tex2D(_NoiseTex, o.worldPos.xy / _Scale + float2(0, sinT) ).r - 0.5);
这里的代码有一个问题,就是在 X 轴和 Y 轴它们的扰动是一样的;结果就是整个抓取纹理以圆形运动旋转,这看起来一点都不像水了。很显然我们需要为此添加一些随机性。
给着色器添加随即行为的最常用的方式就是添加一张噪音纹理。现在的问题就变成了找到一种方法来对纹理进行一个看似随机的采样。为了避免效果看起来有明显的正弦模式,最好的方法就是在噪声纹理的UV数据中使用正弦波作为偏移量:变量 _Scale 用来决定波的大小。这个方案已经很接近最终版本了,但还是有一些问题——如果水体移动,UV数据也会跟着它动然后你就会看到水波跟着材质动而不是锚定在背景上。为了解决这个问题,我们需要使用当前片元的世界坐标作为UV数据的初始位置:float sinT = sin(_Time.w / _Period); float2 distortion = float2( tex2D(_NoiseTex, o.worldPos.xy / _Scale + float2(sinT, 0) ).r - 0.5,tex2D(_NoiseTex, o.worldPos.xy / _Scale + float2(0, sinT) ).r - 0.5);这种没有任何明显的移动方向的无缝扭曲效果确实让人看起来心情愉悦。float sinT = sin(_Time.w / _Period); float2 distortion = float2( tex2D(_NoiseTex, o.worldPos.xy / _Scale + float2(sinT, 0) ).r - 0.5,tex2D(_NoiseTex, o.worldPos.xy / _Scale + float2(0, sinT) ).r - 0.5); o.uvgrab.xy += distortion * _Magnitude;
注意
正如所有的这些特效一样,没有完美的方案。这个知识点向你展示了创建类似水的扭曲的技术,但是我们鼓励你多对它进行试验,直到你找到一个符合你游戏美术风格的效果。
希望它能帮到你或者帮你找到思路(^_^)选个表情,或者留个评论吧!